Lesson 7: Prisms (3D Form)
The instructor tells children the following:
- Thus far, you've created flat drawings in the two dimensions of length and breadth.
- Now we will study prisms - form in three dimensions - length, breadth, and depth.
- We will draw three dimensional (3D) representations of the triangle, the rectangle, and the circle.
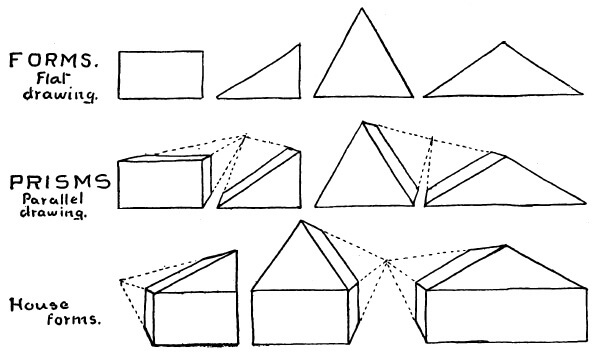
The instructor shows children the following in the top image:
- Rectangle
- Right Triangle
- Equilateral Triangle
- Obtuse Triangle
- Rectangular Prism
- Right Triangular Prism
- Equilateral Triangular Prism
- Obtuse Triangular Prism
- Three Dimensional House (Combination of Triangular and Rectangular Prism)
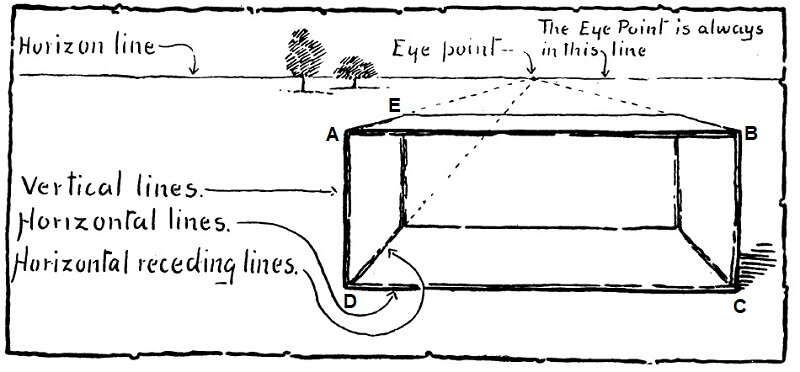
The instructor shows a a real example of a rectangular prism:
- Use a crayon box or other small box as a model.
- Place the box on the table before you in the position of the bottom image.
- Observe that the box has:
- Six faces. Top face, bottom face, front face, back face, right face, and left face.
- Four vertical edges, four horizontal edges, and four horizontal receding edges:
- Twelve edges or lines in all - three sets of four lines each (four vertical, four horizontal, four horizontal receding).
- The four receding lines all converge on a point on the horizon.
The instructor helps children master drawing a rectangular prism:
- Use an erasable pencil for the drawings. Draw freehand without a ruler.
- Draw the front face - A, B, C, D.
- Draw a line above the front face of the rectangle representing the horizon.
- Choose the eye point of vision on the horizon and mark it with a dot.
- Draw light lines from each of the corners to the eye point.
- Draw the back face E.
- Finish the visible lines with heavier strokes.
- Add a few trees - recall that the horizon passes through where the branches/foliage meet the trunk.
- Repeat steps above until mastered.
 Fourth Year Drawing
Fourth Year Drawing
Fourth Year Drawing


 About
About Curriculum
 Navigation